Adding the Sublytics tracking pixel to your website will allow you to track all referring traffic to your website. This will provide insights into acquisition efforts and their associated lifetime, along with gaining access to different attribution and views and return on investment for paid media channels.
In this Article:
- Creating a Tracking Pixel
- Placing the Tracking Pixel
- Sublytics Hosted Pages
- Shopify
- Recharge
- CrateJoy
- Bold
- Landing Page
- Connecting a Custom Domain: First Party Ad Tracking
- Pixel Validation
- Adding Pixel Parameters to Reporting
Creating the Sublytics Pixel
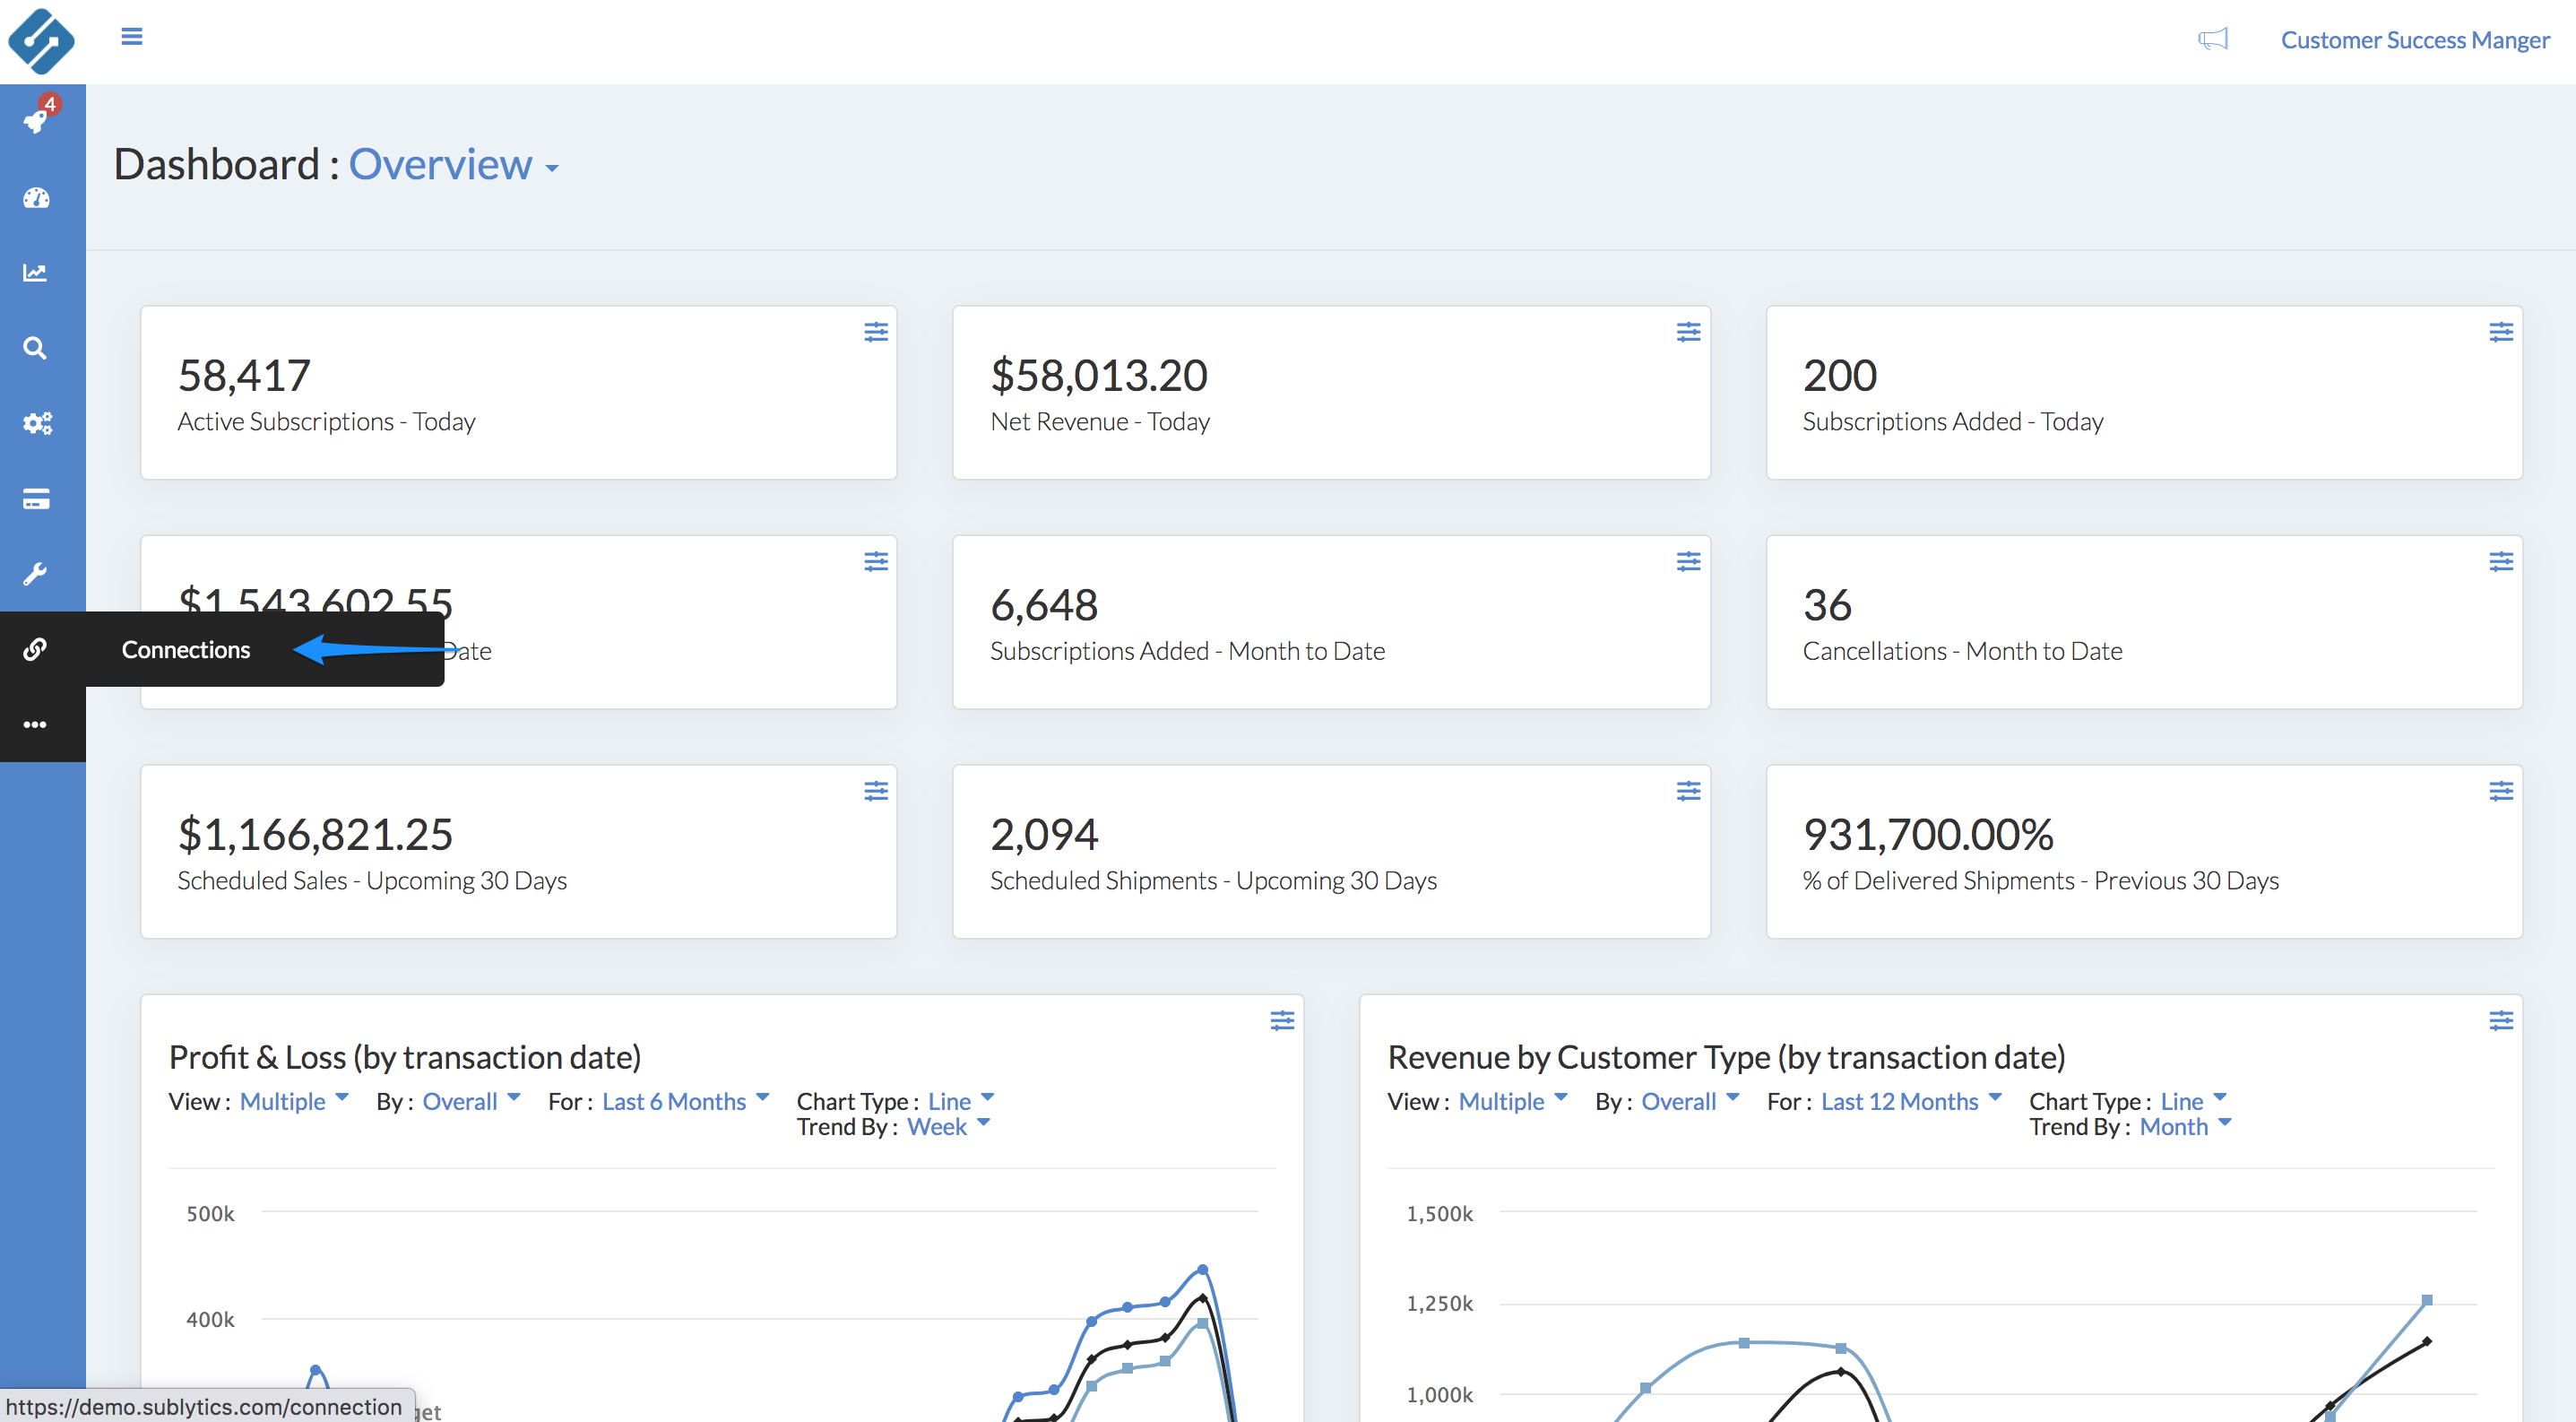
Within your Sublytics profile navigate to the Connections tab. Your store's Sublytics Tracking pixel will be created here.
On the connections page, locate the "add new" button.

In the connection categories, find the Sublytics connection and "add new". This will create the pixel. Navigate back to the connections page, and click into the "Sublytics Tracking" item for the pixel script to pop up.

You are now ready to place this in your store.
Placing the Sublytics Pixel
Once you have your Sublytics tracking pixel, you will need to place it within your store. Depending on the platform you use, you will need to put it in different places.
Shopify and ReCharge Pixel Placement
Installing the Sublytics Tracking Code on Shopify and ReCharge needs to be placed in three different locations, in order to track page visits and tie them to orders.
Within your Sublytics profile navigate to the Connections tab. Your store's Sublytics Tracking pixel will be located here.
Click into the "Sublytics Tracking" connection to access and copy the pixel code.
Location 1: Shopify Theme
The first location the Sublytics Tracking Code needs to be placed is within the Shopify theme pages. This will display the code on all non-checkout pages within Shopify (i.e. Home Page, Product Pages, etc).
Under Shopify Sales Channels/Online Store navigate to Themes. Navigate to the button named Actions.
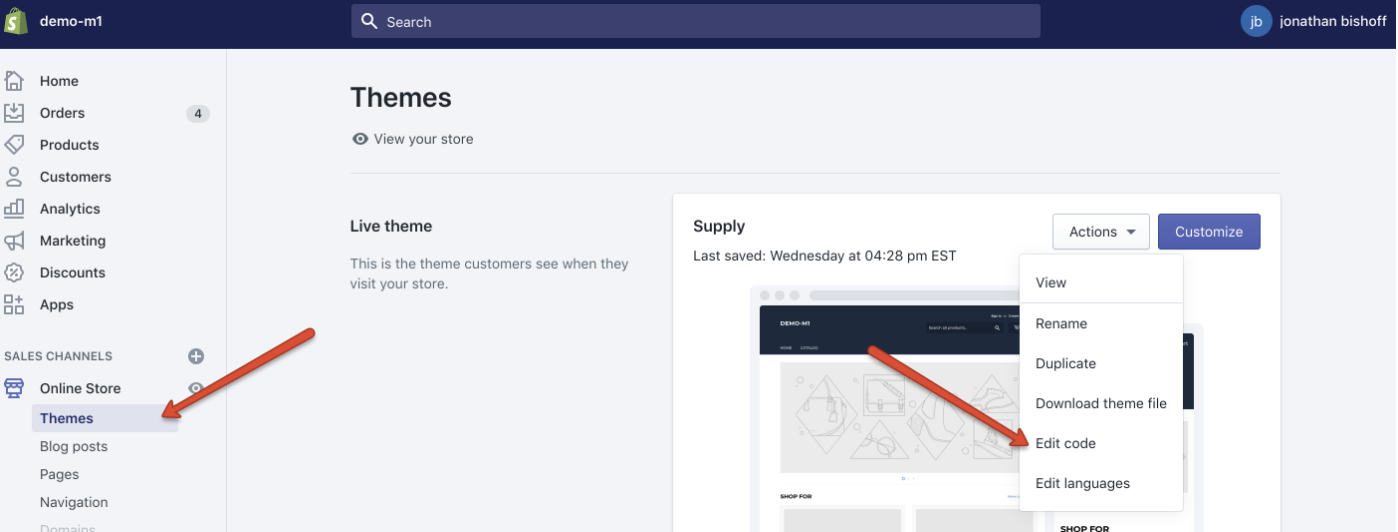
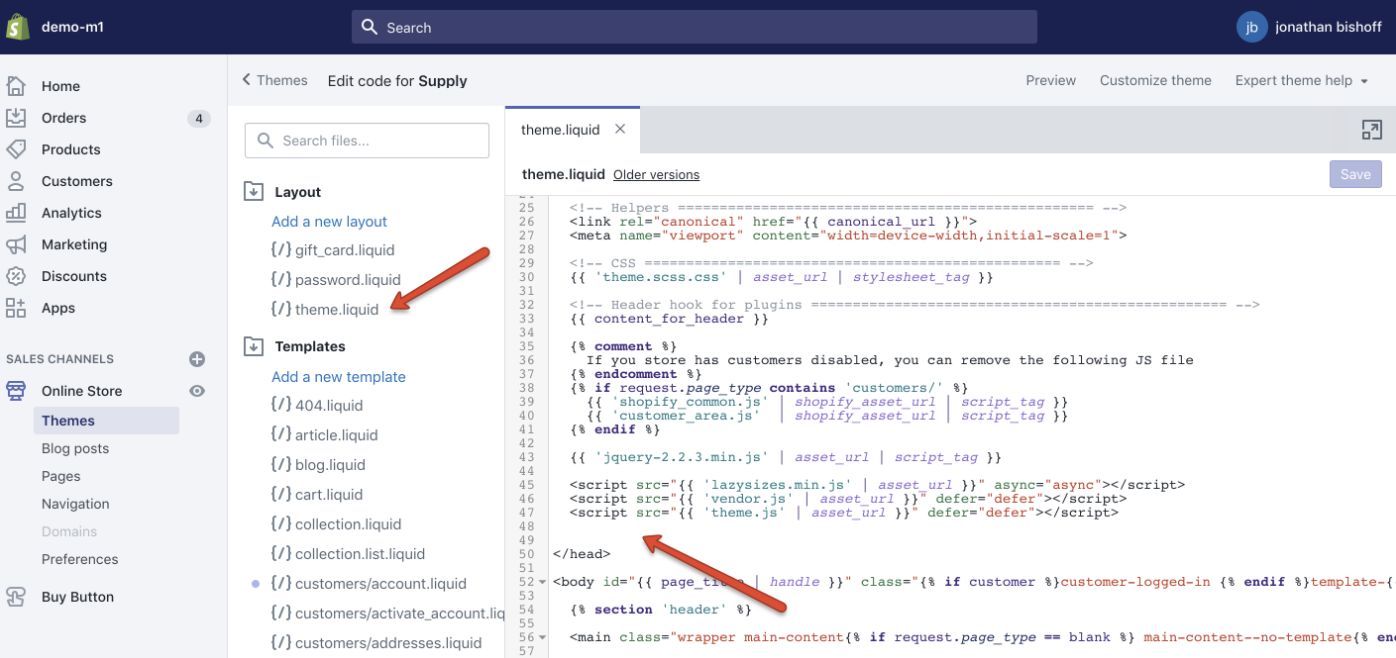
Navigate to the Edit Code option. Once you are on the Edit Code page, navigate to Layout and then theme.liquid. Paste the tracking code directly into the <head> section of your site. Once you do this, all the pages will start displaying the tracking code.
Location 2: Shopify Checkout - Order Confirmation Page
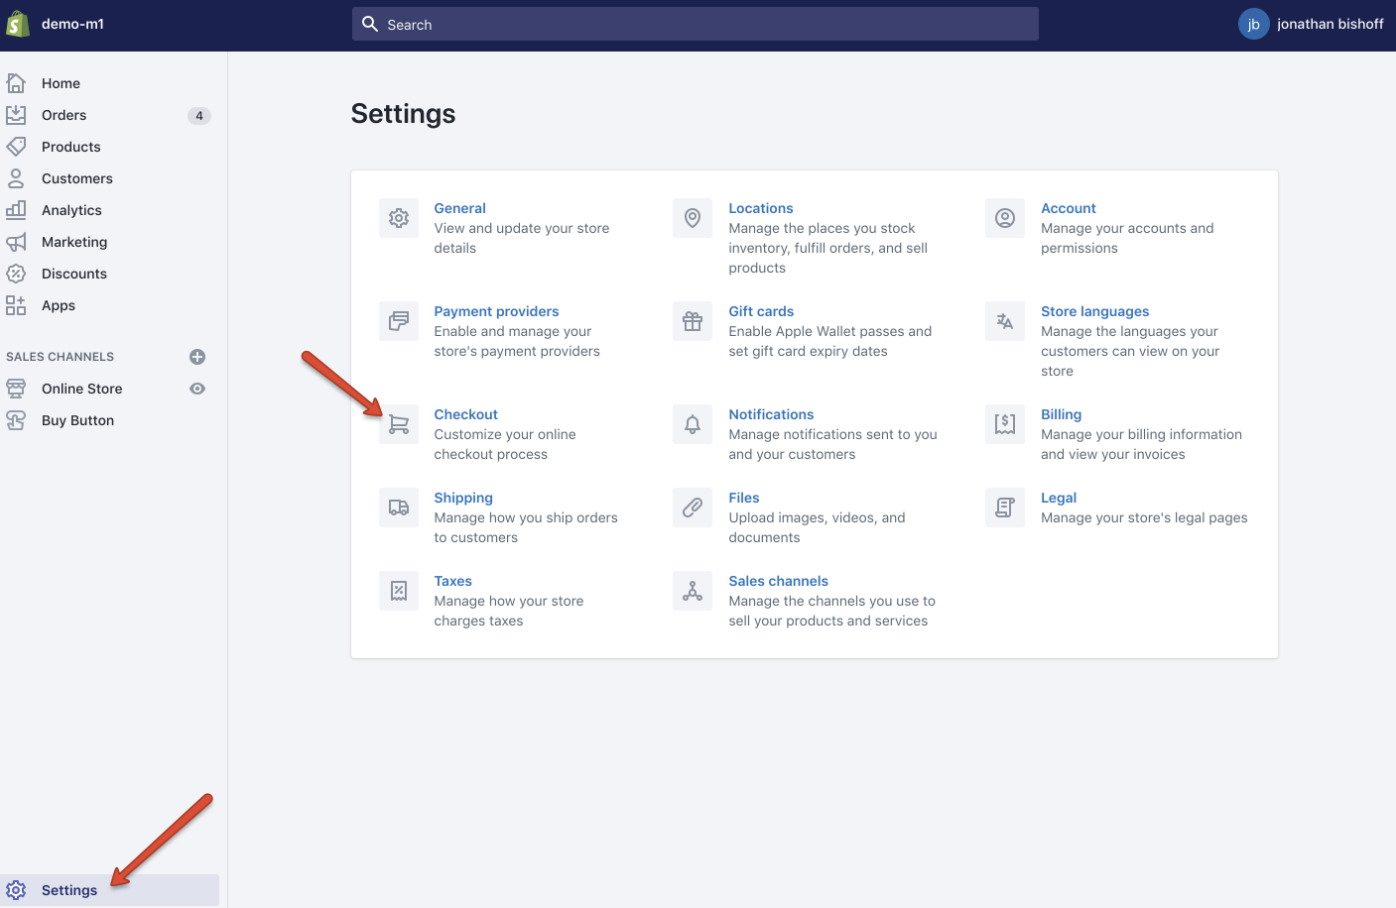
To place the pixel to the order confirmation page, navigate to Settings - Checkout (/admin/settings/checkout). Scroll down, and you will see a text area box named Additional Scripts under the Order Processing section. This is where the pixel will be placed.
At the end of the pixel you will need to update the Order ID parameter by adding {{order_number}} in between the quotation marks on the line: saa("set", "order_id", ""); Adding this code will allow Sublytics to collect the Order Number.
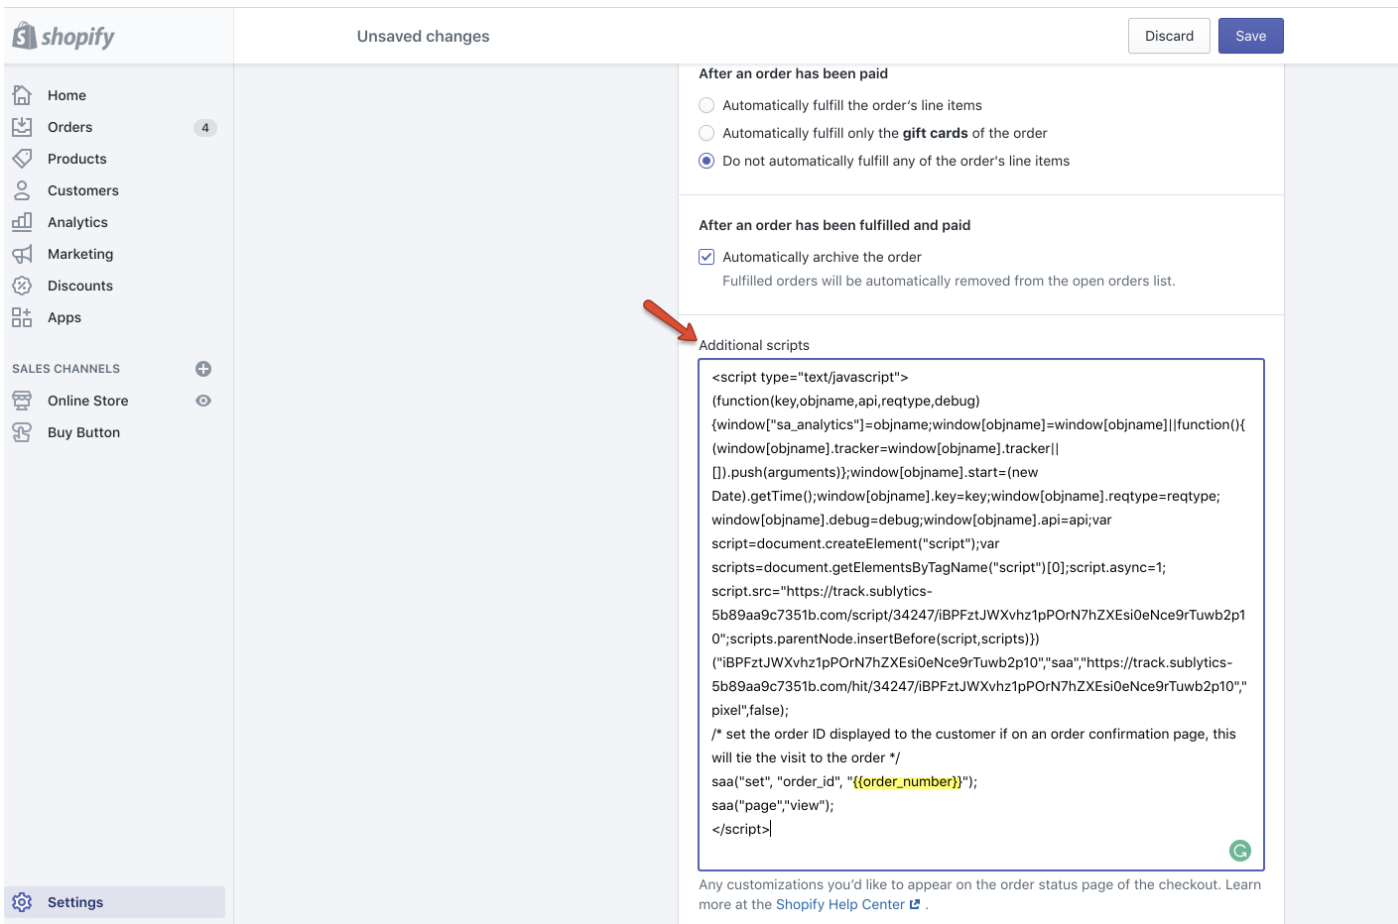
Note: For security reasons, Shopify does not allow you to edit the checkout pages with custom JavaScript, but they do allow you to put some custom JavaScript on the order confirmation page.
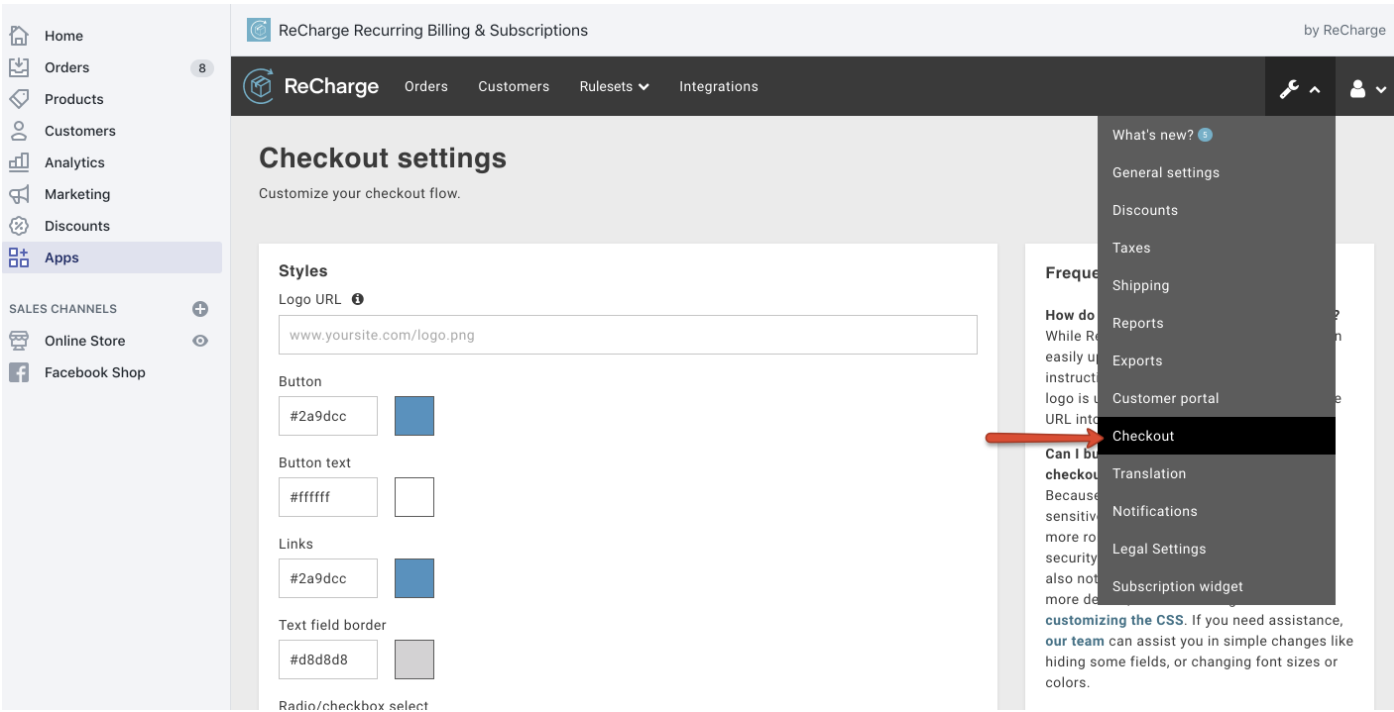
Location 3: ReCharge Order Confirmation
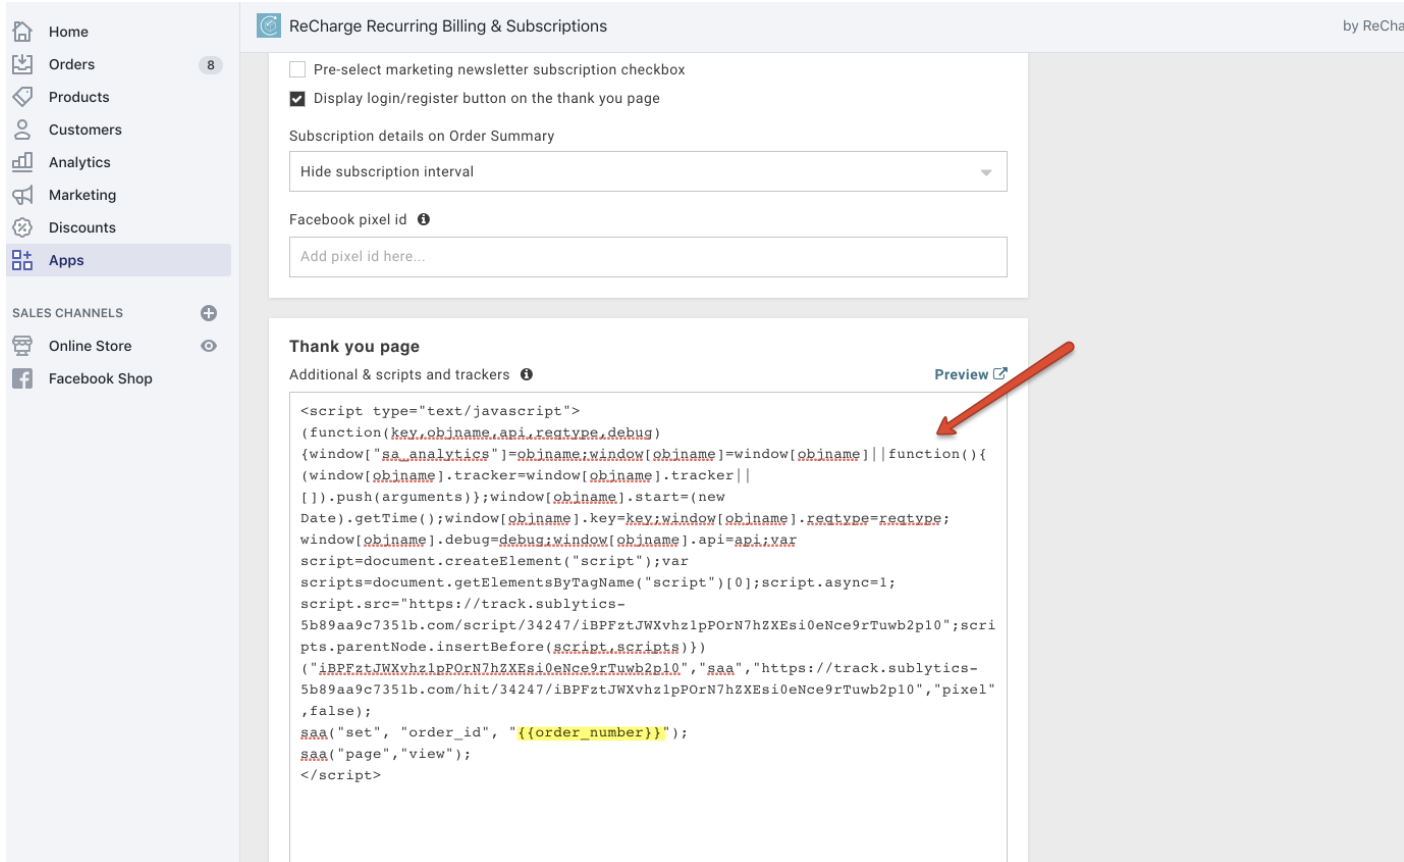
Similar to location two, the code needs to be placed on the ReCharge Order Confirmation page as well. Navigate to Recharge Payments App Settings Checkout (/admin/apps/shopify-recurring-payments/settings/checkout). Once on this page, find the Additional & scripts and trackers under the Thank You Page section.
Paste the exact same script from step 2, including the updated Order Number parameter: saa("set", "order_id", "{{order_number}}").
Installing the Sublytics Tracking Code on CrateJoy requires it to be placed in two different locations, in order to track page visits and tie them to orders.
Within your Sublytics profile navigate to the Connections tab. Your store's Sublytics Tracking pixel will be located here.

To access the pixel code click the edit button under the actions symbol. Then copy the code.
Location 1: CrateJoy Theme
The first place where the Sublytics Tracking Code needs to be placed is within the CrateJoy theme pages. This will display the code on all non-checkout pages within Cratejoy (i.e. Home Page, Subscription Flow, etc.). Navigate to the Design tab, then to the button named Code. Once here, you can edit the actual website code. Choose the base.html file under HTML. Paste the tracking code directly into the section of your site. Once you do this, all the pages will start displaying the tracking code.
Location 2: Thank You Page
The second place you need to add the Sublytics Tracking Code is on the Thank You Page. Navigate again to the Design tab, then to the button named Code. Click on Components > Customer > Thank_you > Customer Thank You Content component.html. Paste the pixel here. At the end of the pixel you will need to add {{order.id}} within the quotation marks on the line: saa("set", "order_id", "{{order.id}}"); Adding this code will allow Sublytics to collect the Order Number and you will start to see order data come through in your Website Activity report.
If you're looking to add the Sublytics pixel to a Tag Manager, you can add it directly to the container for your desired Tag Manager and confirm that:
- The tag manager code is placed on all web pages + your confirmation page
- You have updated the Order ID parameter within the Sublytics pixel to reference your tag manager's dynamic Order ID tag that matches e-commerce platform's Order ID. Update this in between the quotation marks on the line: saa("set", "order_id", ""); Adding this code will allow Sublytics to collect the Order Number upon checkout.
Bold Users: If you are using Bold, use BOLD.order.public_order_id as Order ID tag
If you leverage individual landing pages and a hosted checkout, it is recommended to add the Sublytics pixel to all individual landing pages as well as the checkout and confirmation page.
- Add the Sublytics pixel directly to source code for all individual landing pages 2.) If hosting a multi-page checkout, add pixel to the available checkout pages. Note: you will not be able to add the pixel to the checkout page which collects credit card information.
- Add the pixel to the confirmation page and ensure that you have updated the Order ID parameter within the Sublytics pixel to pass the dynamic order ID tag that matches the e-commerce platform's Order ID. Update this in between the quotation marks on the line: saa("set", "order_id", ""); Adding this code will allow Sublytics to collect the Order Number upon checkout.
Bold Users: If you are using Bold, use BOLD.order.public_order_id as Order ID tag
You are able to leverage first party pixel tracking by adding your custom sub domain to a marketing connection within Sublytics.
Connecting a Custom Domain: First Party Ad Tracking
-
-
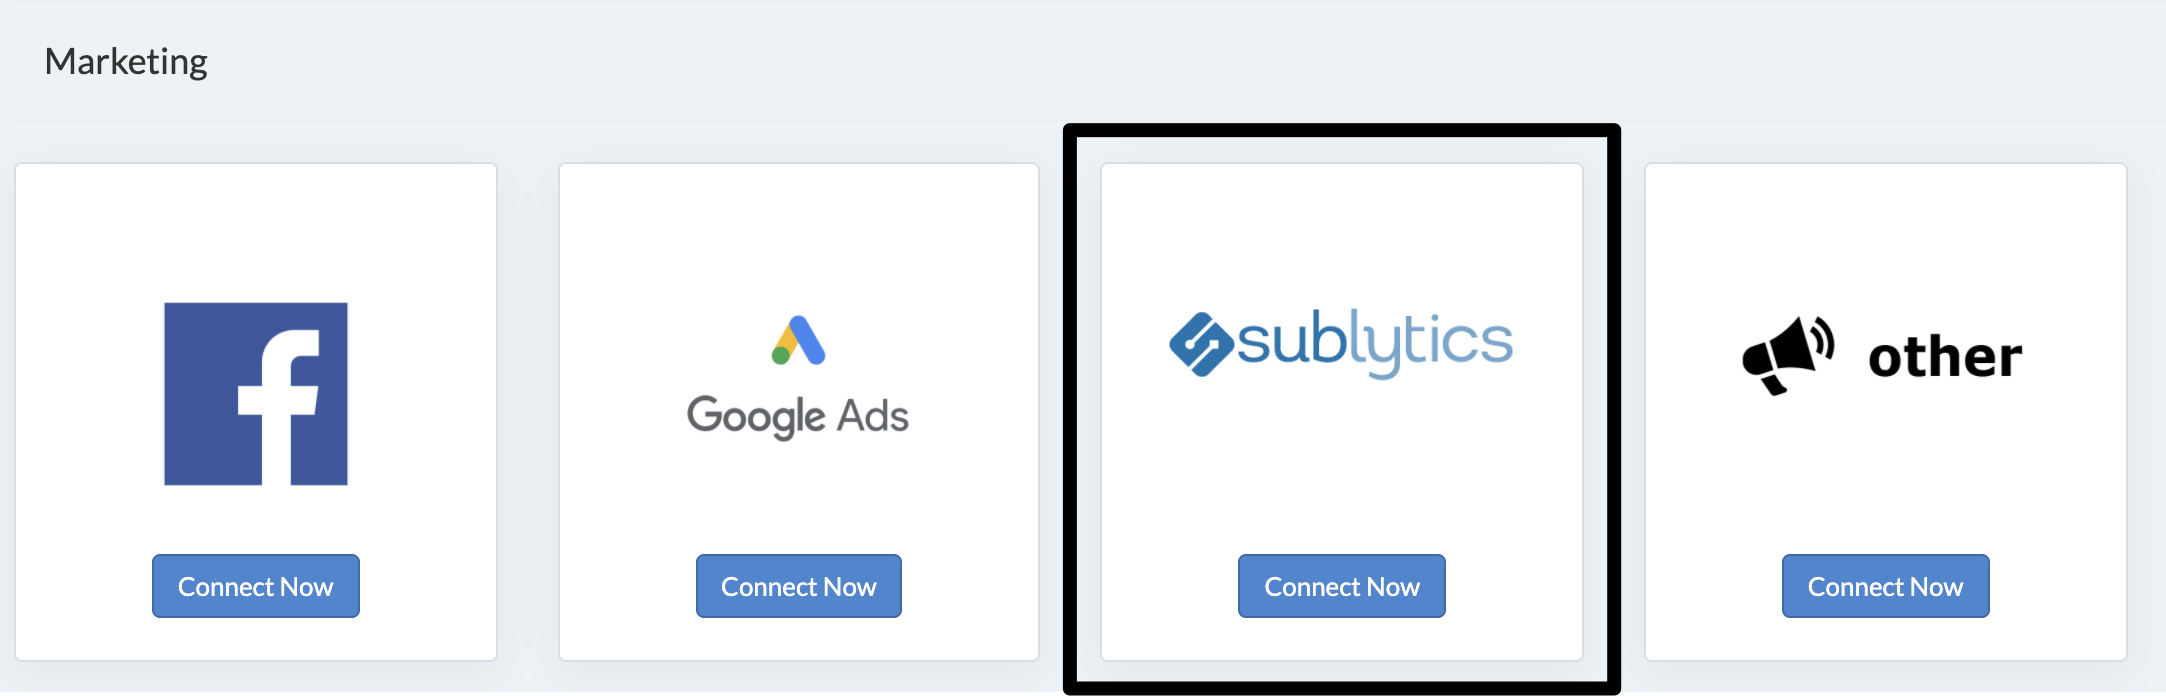
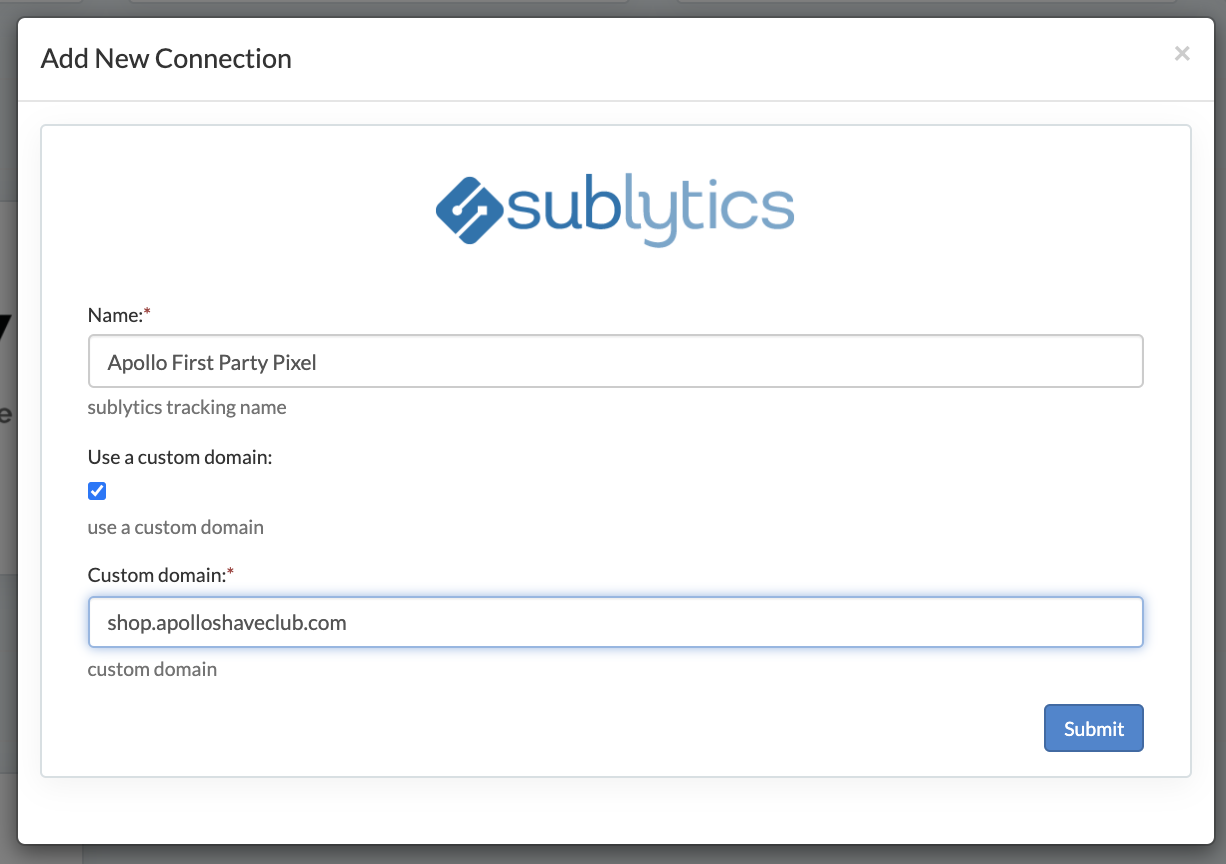
- Create a new Sublytics Marketing connection by navigating to: Connections > Add New > Sublytics (under Marketing section) and select 'Connect Now.'
- Name your Connection and select 'Use a Custom Domain' checkbox.
- Enter your custom sub domain and click Submit. Example: subdomain.domain.com or shop.apolloshaveclub.com.
- Note: This must be a unique domain that is not already pointing to your store; therefore you can't leverage an existing domain that is already in use. Select a sub-domain that does not reference terms like "track" or "counter" which could be blocked by adblockers.
- Note: This must be a unique domain that is not already pointing to your store; therefore you can't leverage an existing domain that is already in use. Select a sub-domain that does not reference terms like "track" or "counter" which could be blocked by adblockers.
- Reach out to your Customer Success Rep or email us to confirm the custom tracking domain submitted in step #3.
- You will be receiving an automated email from AWS for HTTPS verification of domain ownership. You must respond to this email within 72 hours by accepting the request.
- Up to eight automated emails are sent to the following addresses:
-
- WHOIS listed domain registrant
- WHOIS listed technical contact
- WHOIS listed administrative contact
- administrator@
your_domain_name - hostmaster@
your_domain_name - postmaster@
your_domain_name - webmaster@
your_domain_name - admin@
your_domain_name
-
- You only need to validate from one of the emails.
- Up to eight automated emails are sent to the following addresses:
- Once we confirm the domain has been validated, we will give you the value that your development team will need in order to set up the CNAME record for that domain.
- Your development team will need to create the CNAME DNS record for the sub domain submitted from step #3 to be set to the value we give you in the previous step.
- You are done! This will be active as soon as the DNS records propagate.
- Create a new Sublytics Marketing connection by navigating to: Connections > Add New > Sublytics (under Marketing section) and select 'Connect Now.'
-
Once this has been complete and the pixel has been placed, create Ad Trackers with your new custom domain to begin tracking with a first party pixel.
Validation
Once your pixel has been placed and is passing data to Sublytics, you will have to select what parameter filters you would like to come through in reporting. You can find a guide on how to do this here.
Once your pixel has been placed, its passing referring traffic information to Sublytics and you will be able to see referring domain as a filter in most reports. Check out your Web Activity report to confirm that this is working as expected.
If you would like to be able to drill down further into UTM parameters, make sure that your tracking URLs are formatted correctly and that those parameters have been added to your connection here.
Having trouble? Check our troubleshooting checklist here.
Adding Pixel Parameters to Reporting
The Sublytics tracking pixel collects various data points from the visitors on your site. Since website configurations and reporting needs differ from business to business, we allow you to select which pixel filters you want to add to your analytics.
To select the filters to add to reports - navigate back to connections and select the edit button for "Sublytics Tracking". The configuration form below will open.

Select from the list that appears when you click the "Report Parameters". This list will show all parameters visible to the pixel, so often times it will be a very large list. You will only need to select parameters you would like to show within reporting, and you can always come back to edit the connection later if you add a new parameter or forgot to include one.
Note: If you have more than one store connected be sure to link the connection to the corresponding pixel.